

- Published on
Git for very newbie developers
- Authors
- Name
- Lorenzo Pieri
- @404answnotfound


Table of Contents
What is git and why is it important?
If you are reading this blog post it might be because you are either very new to software engineering or you come from a programming background that had no need whatsoever about VCS.
Now, hold on, hold on, hold on! The fuck is a VCS? That would be an acronym for Version Control System. Tech people have to deal with so many words, phrasings, definitions and whatnot that having acronyms sure is a life saver!
As I said in my previous post, learning acronyms is also part of the 404 journey. But do not fear, we are here to conquer the software engineering world, together, as a team!
Today we are going to delve into the basics of git, a command-line utility which is in truth a very complex versioning system to aid you in your development adventure.
No more shall you name your files final, finalfinal01 and thisreallyisthefinalversion999 for now you will have the absolute power of doing:
git checkout -b "finalfinalfinalversion"
# more on this beauty later in the article


But let us leave the jokes aside for a moment and get a hang on what git is and how we can use it to become better software engineers and use it in our day to day job.
The git software is a full scale version control system that can be used to control the changes to your codebase (but not only that) and allow you to go back and forth in your changes timeline.

In simple terms for nerds, it's like having a tweaked infinity time stone that allows you to move inside the entire timeline of your project.
With such powers you can revert files to a previous state and if you change your mind you can say fuck you previous state and go back to the newer state. It's a fuckin rollercoaster, that's what git is!
Get used to git for a little while and you'll also discover git blame, because you know, software engineers do love their passive aggressive methods and with the blame command you can scream you suck! into people's Slack channels.
But let's be real for a second.
That's not what it is. The git blame command is just another way to check who did which version of the current timeline so you can go and ask for infos (and scream to their face! Aha! Gotcha!)
So let's put it like this, because lists:
- Git is a software application that lives on your computer (and sometimes comes pre-installed)
- Git helps you keep track of changes to your codebase (or even images collections, movie clips and documents if you want)
- Git is a Version Control System
- Git serves also as a time machine (present to past, past to present) to any point in time of your codebase
- Git enables you to sync and share your codebase with anyone you want to collaborate with (through Repository services, like github, bitbucket, gitlab)
And now, finally, let's move on to the real things!
The basics of git
git installation
The git version control system can be downloaded from the git-scm website with simple installers for macOS, Windows and Unix based distributions so the usage is pretty much universal.
The installation will enable you to use git from the command line but on windows, depending on your development envinronment, you might be asked to install the git bash shell alongside the GUI (graphical user interface).
In the glory of recursion, git can also be installed through git. Never tried it tho.
git init
Now that you have git installed on your systems you can open up any command line, shell, terminal or GUI interface and start typing git commands like there's nothing else to be done in the world.
The first thing you should do if you are not coming from a cloned repository (as we will see later) would be to:
# initialize the repository
git init
# -> Initialized empty Git repository in /Users/404/Desktop/learngit/.git/
git cloning a repository (how and why)
But what does it mean to clone a repository and what the fuck is a repository?
Best get used to the lingo, so we will call your codebase a repository from now on.
A repository is nothing more than the folder you chose to start your project but it is not a real repository until you do something more, and that would be what we might call initialization (more on that in the next section).
But it can happen that you don't want to work on a new repository and so repository cloning comes out and says:
Repository: "know what, why don't you just take all of me and clone it on your computer?"
Thank you, Repository, we will do just that if we find projects that we enjoy!
To clone a repository you need two things:
# a repository that you want to clone, like: https://github.com/pranavnt/RickrollURL

# a git command
git clone https://github.com/pranavnt/RickrollURL
# ➜ Cloning into 'RickrollURL'...
# ➜ remote: Enumerating objects: 446, done.
# ➜ remote: Counting objects: 100% (446/446), done.
# ➜ remote: Compressing objects: 100% (348/348), done.
# ➜ remote: Total 446 (delta 91), reused 429 (delta 81), pack-reused 0
# ➜ Receiving objects: 100% (446/446), 562.92 KiB | 2.50 MiB/s, done.
# ➜ Resolving deltas: 100% (91/91), done.
If you now check your folder, you should notice that a new project has appeared and by taking a closer look, you will also discover that it is not only a new folder with new files, but also a full repository!
Why full? Because whenever you git clone someone else's repository, you are also widthdrawing the entire history (timeline) of that repository.
git workflow
Ok, no matter the choice taken above (either init or clone), we now have a repository at our disposal.
But a folder full of files, controlled by a version control system, is nothing more than a folder if we don't use the powers that git gave us.
That is where the git workflow comes in handy. It's nothing more than a way of using git, a map of concepts and usages, if you will. Nothing scary.
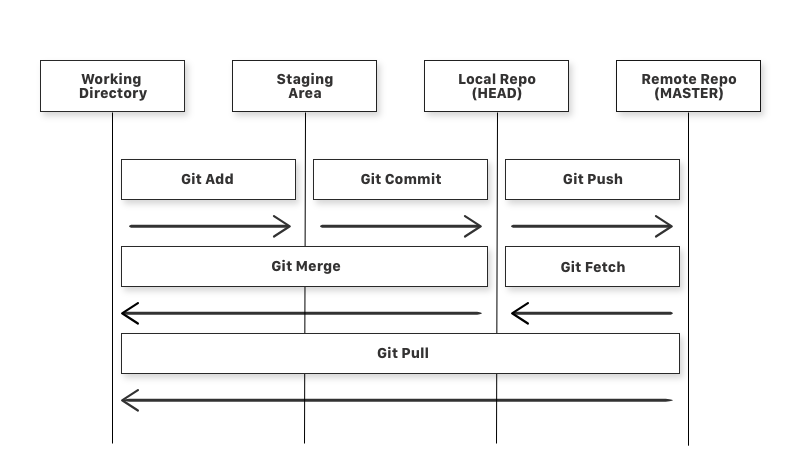 (image courtesy of FreeCodeCamp)
That's a git workflow. Lots of new words, but don't be scared because we will dive into their usage and meaning in the next sections.
Just a simple explanation:
# You choose which files (or all the files with *) you want to _track_ with git in your repository
git add *

# You commit the changes that were done to the files you are _tracking_, in the above case,
# we are tracking all files, so all changes will also be commited to the repository
# Git commit can also apply a message to make things clearer
git commit -m "I changed things"

# All changes that were committed are living in your LOCAL repository (your computer)
# but maybe you want to send them to a remote repository (like Github)
git push -u origin main
Now, now. I know that seems like a lot of stuff, and it is, but all in all the concept is pretty simple.
- You do stuff
- You want to save that stuff
- You want to send that stuff on the Internet
git add and git commit
And that's why you use git add and git commit.
Picture this:
Your files, pictures, movie clips or whatever it is that you are using the repository for, changed.
Why are you using a version control system if not for versioning and having control of your data? And that's exactly what you do with add.
# Again, it is up to you to choose which files (or all the files with *) you want
# to _track_ with git in your repository
git add index.js

# Now that we are tracking index.js, we told git to make sure that ALL the changes
# between the previous index.js version and the current just added version should
# be taken into account for when we commit our changes to the repository
git commit -m "Added new function to the main file"

# Git commit messages (added with the -m flag) should also be descriptive.
# That's not only good practice, it's also a survival practice
# because you will not remember why you did some changes
# after a few months

# If you forgot to add a message or want to modify what you wrote
git commit --amend -m "Added new function to the main file"
git push
We've been amazing so far.
We initialized our folder to become a repository. We added our files to be tracked by the git version control system and commited our changes to our LOCAL repository history.
We could already do a lot of things (like go back and forth between commits), but what we really want right now is to push our changes to a remote repository.
# If we cloned a repository, we just need to
git push

# Or, to be even more precise
git push -u origin main

# If your repository branch (more on that later) is something different
# like master, or feature/functions or others, just change main.
But what if we didn't clone a repository? That means that up until now we don't really have any remote origins to push our content to.
Let's create one with Github's free repository hosting services!
- Go to Github's website
- Login or register an account
- Click on the Github Octocat logo if you aren't on the homepage already
- Click on New and create a new repository
- Input a repository name, a description and whether your repo should be private or public
- Create the repository
The next page on Github will show you the following things that you should do:
echo "# learning-git" >> README.md
git init
git add README.md
git commit -m "first commit"
git branch -M main
git remote add origin https://github.com/your-username/your-repository-name.git
git push -u origin main
Most of the things you already did, but you might want to take care of:
# Rename the branch from master to main because it's important (1)
git branch -M main

# Add the remote origin (where your github repository is) to your LOCAL git repository
git remote add origin https://github.com/your-username/your-repository-name.git

# Push the changes to the remote repository
git push -u origin main
git branches
And to get back on track about what we were saying in the previous section, your naming conventions will have an impact on the way you will git push your changes to your remote repositories.
Another very important command that you will use probably often is going to be:
# Creates a new branch from the "main" git tree (-b flag)
# and checks it out (enters it)
git checkout -b feature/new-function

# ... Do your things, code new things
# ... and go back to the main branch, if you need to
git checkout main

# ... and then back again to feature/new-function branch
git checkout feature/new-function

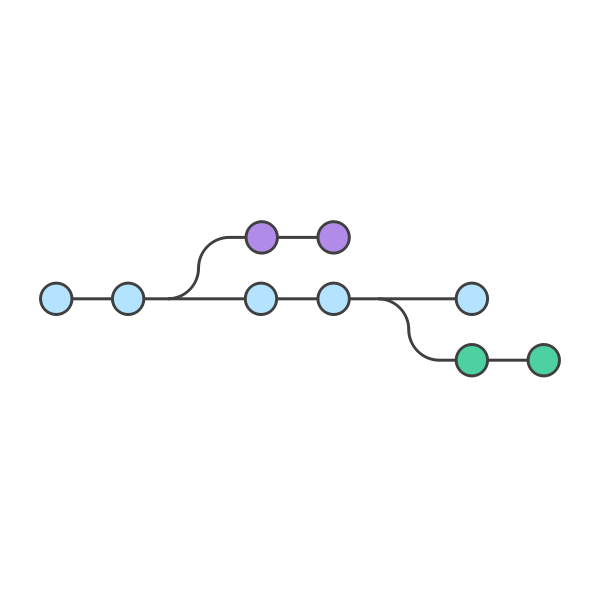
The creation of new branches allows you to detach from the main trunk of the versioning tree and develop your solutions in a safe environment that will not modify what sits on the main branch until later merged.
As you can see from the image we added to this blog post, the branches feature/new-feature and fix/bug-fix are created but never merged back to main, thus, they do not modify the main codebase and the user can safely go back and forth between branches without worrying too much about breaking things.
Fun fact, remember when you git push -u origin main your repo a little back? Turns out you can also push your branches like git push -u origin feature/new-feature
git merge
What we learnt so far is quite amazing and now that we also know how to work with more branches and keep our code safe, it is time for us to get our main branch back on track with what we coded so far:
# First let's check on which branch we are actually on
# just in case we forgot or our terminal is not showing it
git branch --show-current
# ➜ feature/new-feature

# Add and commit our changes to the LOCAL repo feature branch
git add *
git commit -m "added new functionalities to feature/new-feature"

# Back to the main branch, or whatever branch we want to
# merge our feature/new-feature branch to, because yes,
# you can also do multilevel branching
git checkout main

# Merge our changes to the main branch from feature/new-feature
git merge feature/new-feature
git pull
All is well in gitland and you, the lord of the realm, are learning and using all the sword tricks that we've implemented until now.
Friend with many other realms of git users just like you, you start to develop a new app with other people.
You all participate to the same remote repository which you created by following the sections above.
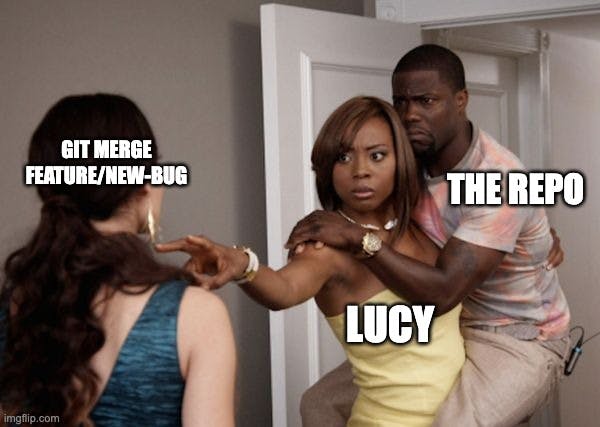
Up to now, you were all very lucky in pushing your changes to the remote repository because you all worked in different timezones, but then Margareth had the brilliant idea of working at the same time to keep eachother company and, regrettably, this came to be:
$ git push
To https://github.com/your-username/your-repo.git
 ! [rejected]        main -> main (fetch first)
error: failed to push some refs to 'https://github.com/your-username/your-repo.git'
hint: Updates were rejected because the remote contains work that you do
hint: not have locally. This is usually caused by another repository pushing
hint: to the same ref. You may want to first integrate the remote changes
hint: (e.g., 'git pull ...') before pushing again.
hint: See the 'Note about fast-forwards' in 'git push --help' for details.
Oh, the despair, oh, the agony. Margareth, oh why thou decided so!


But there is nothing to worry about.
The thing with remote repositories and collaborations is that a lot of people might be able to change your codebase, or maybe you are working on an open source project and the code changes are kind of a day to day operation over there.
To avoid errors such as the ones we've seen just above, we should:
# Get the latest updates on the branches
git pull

# Push our latest modifications if there are no conflicts
git push -u origin main
But there can be conflits between files in git. If that is the case, you will find yourself to deal with differences between the previous version of the codebase and the new, freshly pulled, version of the codebase.
If that is the case, you will notice some changes in your coding environment that urge you to accept incoming changes, accept both changes or accept previous changes and abort new changes.
git development
Of course what happened was indeed a valuable lesson for everyone, but who got the most out of it was Lucy, whom now wants to become the team's DevOps and make sure that everyone adheres to the same git flow.

To do that, she does something that is very normal in the industry:
# Creates the necessary branches to work with the flow
git checkout -b development

# Ask the team members to adhere to some basic rules:
# - New features should have their own branch: feature/new-feature
# - Bug fixes should have their own branch: bugfix/fix
git checkout -b feature/a-new-functionality
Now that we have some basic rules, Lucy enforces (with kindness and expertise) the usage of this git flow:


courtesy of mermaid diagram flow tool, download for better view
All is well again and with the flow being respected, there are no more problems with the production branch (main).
is git github??
Now, we've used Github for the entire time so you might be wondering, is git Github?
The short answer is no, the long answer can instead be found on Wikipedia where you can read about our great hero, sir Linus Torvald.
Github is a great service provided by Microsoft, which bought it a few years back, where you can host your remote repositories for free but Github is not Git.
Git anti-pattern (and what is an anti-pattern?!)
An anti-pattern is something that should be avoided and ruled out.
Let's see a list of possible git anti-patterns to avoid when possible.
- Long-lived feature branches
- Too much or too little time between merges
- Forcing your git push to the remote branch
The goodies
Hopefully you enjoyed this article and are now more than willing to give it your all and to use this amazing version control system that is the standard in the industry.
Feel free to reach out and follow me on Twitter if you want to discuss what you just read or if you want to pick a slot for the next coffee chats where I offer 30 minutes mentor/mentee calls.
Happy hacking!
The goodbye
I hope you found this article useful and to your liking and if you have any requests, drop a message on one of my social media accounts or open an issue/start a discussion on github, on this repository!